Curse, Inc. is a professional gaming website spanning multiple games and countries. The Company is comprised of community sites, tools, databases, videos, guides, live streaming, and eSports teams.”
Curse Inc has been a portal for a variety of different gaming websites, originally founded in 2008. Curse’s latest addition to their portfolio is the Curse app, an application with a growing array of features, such as World of Warcraft addon management, and more importantly, a platform to create and manage online communities. More specifically, the Curse app boasts several features specifically designed to enhance the experience your viewers can have while you’re offline, and can even allow you to collect meaningful opinions on important matters!

______________________________________________________________
Getting Started
Downloading the Curse app is easy – just head to the Curse’s website and select the version you require (PC/Mac). Run the installer like any other program, and the Curse app will be installed on your computer.

After the app has installed, you will be prompted to sign in to your Curse account. Whilst World of Warcraft and Minecraft users may already have a Curse account, simply press ‘Create an Account’ and follow the onscreen instructions to create your own Curse account.
After logging in, you’ll be presented with the Home screen – a summary of the different things you can do with the app, along with the latest Curse news. The green portal shown below relates to the launch of World of Warcraft’s latest expansion, Legion.

______________________________________________________________
Creating a Server
After selecting the ‘Connect’ button (represented by a +) on the left hand side of the client, the following page will show:

Selecting the last option, ‘Create a Server’, will prompt you to specify what the purpose of the server is: are you a content creator, World of Warcraft guild, Team/Clan or would you prefer a custom server?
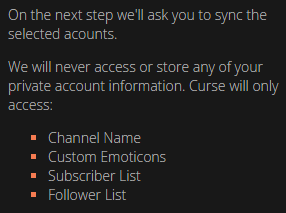
Assuming you wish to use the client to start an online community for your Twitch channel, select Content Creator. From this page you’ll be asked to sync your Twitch account to your Curse one – be aware of what information Curse will have access to after the sync:
After authorizing the Curse App to access the information, your Twitch account will be synced and your server will be open to customization.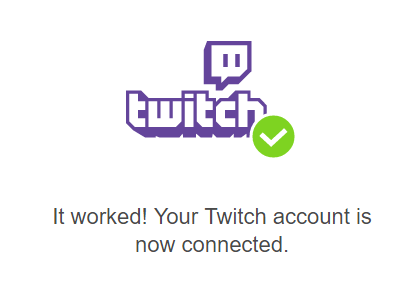
That’s it – select ‘Let’s Go!’ and your very own Curse server has been created.
______________________________________________________________
Customizing your Server
The Curse Client offers a variety of different customization options, both for your individual client and your server. Your personal client settings can be found by accessing the Settings tab by pressing the cog in the bottom left-hand corner. Customizing a server, however, is different. This bar will show near the top of your client:

Pressing the cog will open the Admin Panel, where your server’s settings can be found.
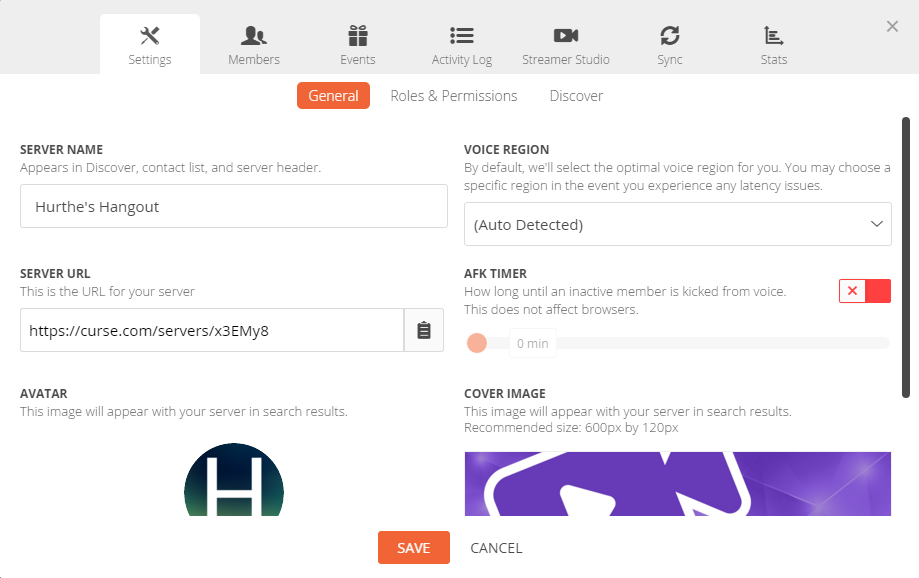
The several tabs will allow you to access a wide variety of customization and information.
Note: Partnered Twitch streamers will have the option of a custom Curse URL (www.curse.com/streamername).
______________________________________________________________
Members
Members of your server can be split into different ranks, which are fully customizable. You can use them to split your viewers into subscribers, moderators, normal viewers, etc. Along with granting these ranks different privileges (banning, promoting) the ranks will share different colors, making recognition of different ranks easy in chat. These ranks can be managed from the ‘Settings‘ tab.
Through their chat bot, Curseappbot, Curse can automatically assign the ‘Follower’, ‘Subscriber’ and ‘Moderator’ ranks to users who have synced their Twitch accounts with their Curse ones. Of course, the rights that these ranks hold are fully customizable by scrolling down the page below.

The ‘Members‘ tab will, quite simply, display information about the members of your Curse server. This includes a member list, ban list and a list of recent invites:


______________________________________________________________
Events
The ‘Events‘ tab holds the features that make the Curse app especially good for streamers and content creators wanting an offline community – not only can polls be created to determine the opinions of your userbase, but you can also host giveaways exclusively to those on your Curse server.
Polls
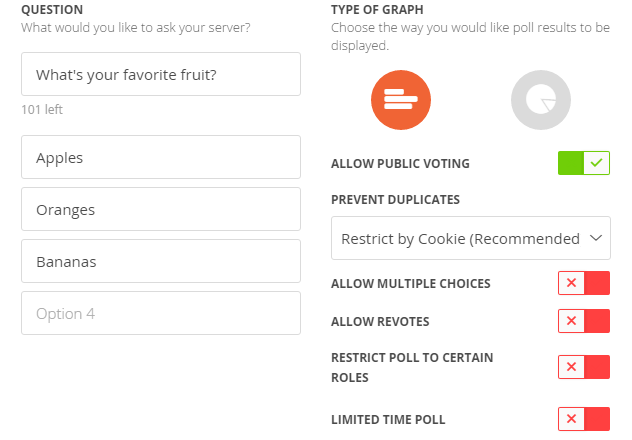
Polls allow a streamer to ask open questions to their viewers in an attempt to gauge an overall opinion. To create a poll, fill in the question box along with the options that your viewers will have to answer. For example:
After choosing whether you would like the results to be displayed in a bar or pie chart, select ‘Start Poll’ and Curse will notify all members of your server that a poll has started:

Polls can of course be closed and opened at the discretion of the streamer at any time. Results will be displayed to all who have voted underneath the channel list:

Giveaways
Giveaways are becoming increasingly popular as streaming communities grow. To supplement this, the Curse app offers a giveaway system so that you can run giveaways with ease. Giveaways can be created and managed through the ‘Events‘ tab, as shown below:

When you are happy with the options, select ‘Create Giveaway’ to launch the giveaway. Like a poll, all members will receive a notification that the giveaway has commenced, and the giveaway can be tracked live underneath the channel list.
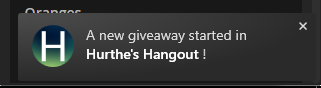
If a viewer is selected as the winner, a similar notification will appear on their screen:

______________________________________________________________
Activity Log
The ‘Activity Log‘ will display a list of recent events that have taken place in your server, whether it be members joining, a record of the latest giveaways and their results, or anything else that has happened that Curse keeps a log of.

______________________________________________________________
Streamer Studio
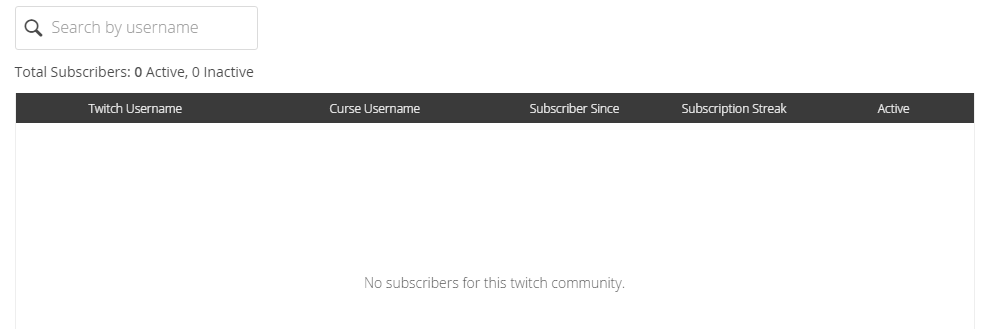
This tab allows streamers to examine their Curse server, especially in relation to their Twitch stream. Curse will display a list of Twitch subscribers and their relevant Curse information, along with several other features that haven’t been announced yet, which include: the ‘Info’ section; a ‘Chat Bot’ section; and the ability to enable/disable Streamer Mode.
Most aspects of the current Streamer Studio are inaccessible by users other than the broadcaster, so your moderators will not be able to see the list:
Streamer Mode
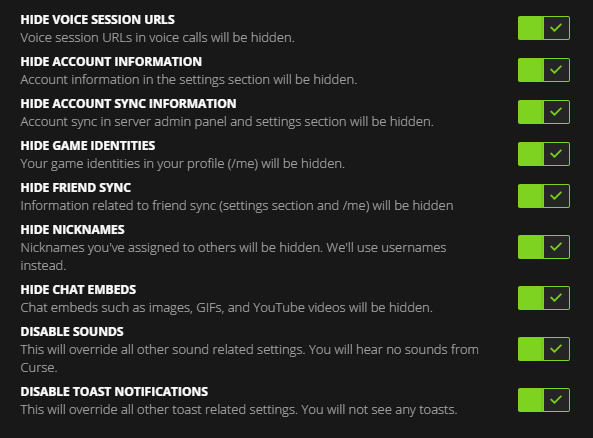
‘Streamer Mode‘ is a option available to Twitch streamers that will alter their Curse experience when streaming. By default, Curse technology will detect when you start to stream with OBS or XSplit, and will automatically enable Streamer Mode.
All features Streamer Mode customizes can be altered, along with the auto-detect ability, in the tab’s settings:
______________________________________________________________
Moderation – Banning, Removing, Unbanning and Deleting
The Curse client allows your community to engage and chat with each other. Of course, moderation will be needed in some situations – as a result, Curse allows you, and moderators you employ, to ban and delete users’ messages as and when you need to.
To perform an action against a user, click their name in the chat room, and the following menu will appear:

Banning/Removing
Select the option you desire from the menu. The following dialogue box should appear, which allows moderators to complete the action and provide a reason:

In addition to banning a user moderators may also ban a user’s IP address (meaning they can’t join on multiple accounts) and, if desired, delete all the messages they have entered within a time frame you wish.
Other users will see the following response when a user is banned from the channel:
![]()
Unbanning
A user may also be unbanned at any moderator’s discretion. To unban a user, open the Admin Panel from the server page and head to the ‘Members’ tab, under ‘Bans’. To unban a user, simply press the ‘Unban’ button on the right-hand side of the bar:

… and the user will have been unbanned.
Deleting
A ban may not always be necessary – a subscriber may have just posted one offensive image, for example. Instead of banning a user, moderators may also delete messages – simply press the ‘Delete Message’ button next to a user’s message to delete the message: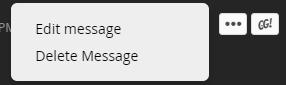
Other users in the channel will see the following message (‘deleted by <Moderator>’) replacing the user’s original:

______________________________________________________________
NB: ‘Coming Soon’
Some of Curse’s features have not been implemented into the app yet. However, when these new features are released, this guide will be updated accordingly.